Introduction
What is Eris Linux?
Eris Linux is an industrial distribution for embedded Linux.We have made a significant effort to make Eris Linux as easy to configure and use as possible.
We started from the observation that building an image for embedded Linux using the usual tools (Yocto Project or Buildroot) requires too much investment in time and resources when you need to focus on developing your specific business application.
This necessary investment will become even more significant with the arrival of requirements such as the European Cyber Resilience Act (CRA) and the obligation to monitor published vulnerabilities on a daily basis.
For you, Eris Linux comes in the form of a ready-to-install image, offering robustness, power, and the possibility of regular and secure updates. On top of this image, you will install your application code in isolated containers.
The only software you will need to worry about is your application program, which you can develop, deploy, and update independently of the underlying Eris Linux system.
Now you will better understand the image conveyed by our logo: Eris Linux is a kind of a container carrier, a robust and perfectly maintained platform ready to host your software containers offering your application code to your customers.
Key features
- The Eris Linux system is built by our team using the Yocto Project, and we maintain it on a daily basis to check for known vulnerabilities and update packages.
- You never need to compile anything other than your own code. You don’t need to known anything about Yocto Project either.
- Your custom code is hosted in Docker containers which are isolated from the base system. The Eris API gives you access to all the device features.
- With the Eris Device Manager, you can deploy containers on remote devices and retrieve their execution status.
Typical Use Cases
Eris Linux is a highly versatile operating system that can be used for a wide range of applications, from industrial embedded systems with varying security requirements to IoT developments for home automation or domestic use.
It is crucial, particularly in order to comply with the requirements of the Cyber Resilience Act, to have a means of updating applications and system software, even for equipment installed at end users’ premises.
While an internet connection is preferable for this purpose, it is also possible to update non-connected systems using removable storage devices, such as USB keys or SD flash drives.
We provide comprehensive system software maintenance through daily vulnerability and patch monitoring for embedded open-source applications. We provide update image files as needed. These can be installed automatically or on demand on Internet-connected equipment.
Getting Started
Accessing the Device Manager
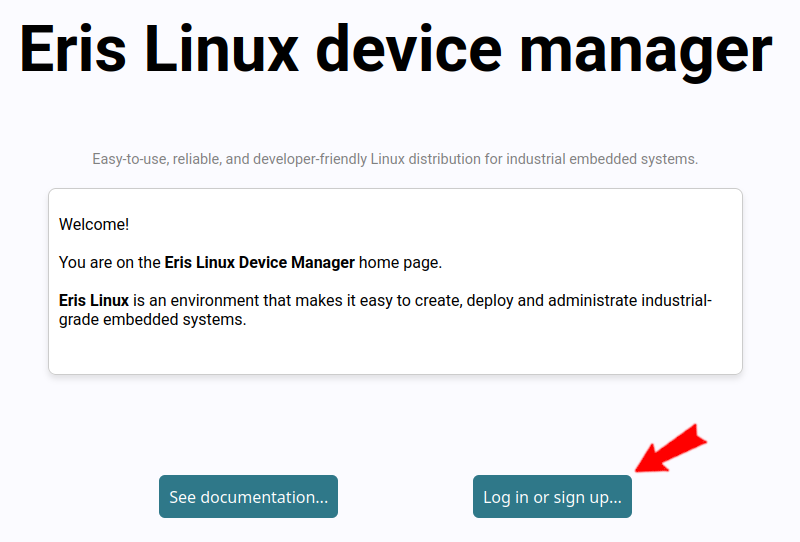
To get started, create an account if you haven’t already done so at www.eris-linux.net.
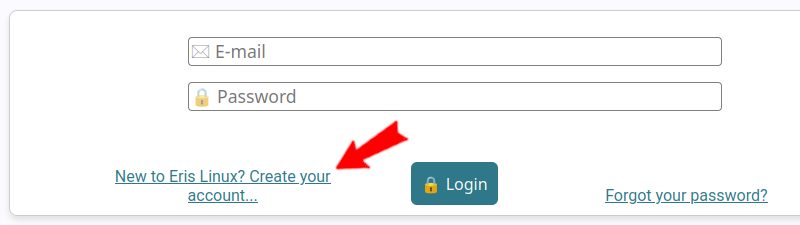
On the login screen, select the “Create your account…” button:
Enter your login email address and choose a secure password:
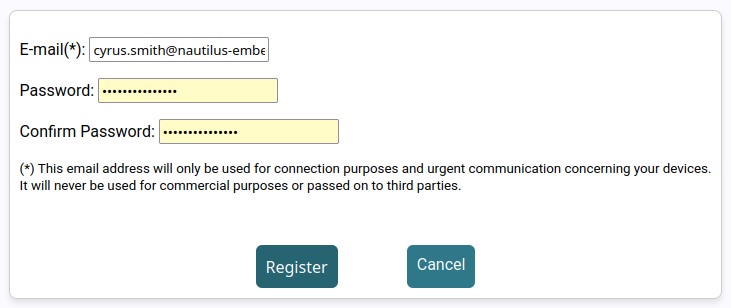
The email address you provide will only be used for urgent technical communications regarding your account and will never be shared or used for commercial purposes.
Now you will be able to log into the device manager:
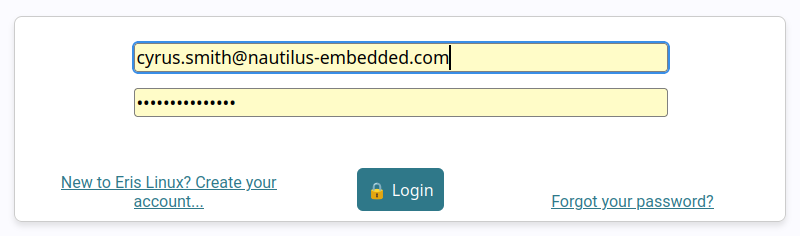
Once you have registered and logged in, you will have access to the features of the Eris Linux Device Manager.
User Account Setup
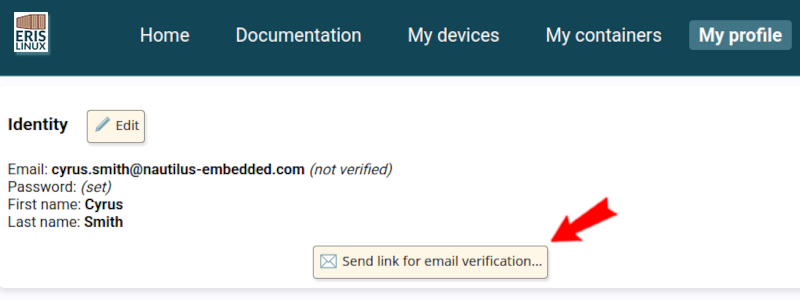
Before you can install and control embedded equipment, you must configure a minimum amount of information about your user profile.
Go to the “my profile” tab in the Device Manager, fill in the “First name” and “Last Name” and ask for a link to confirm your email address:
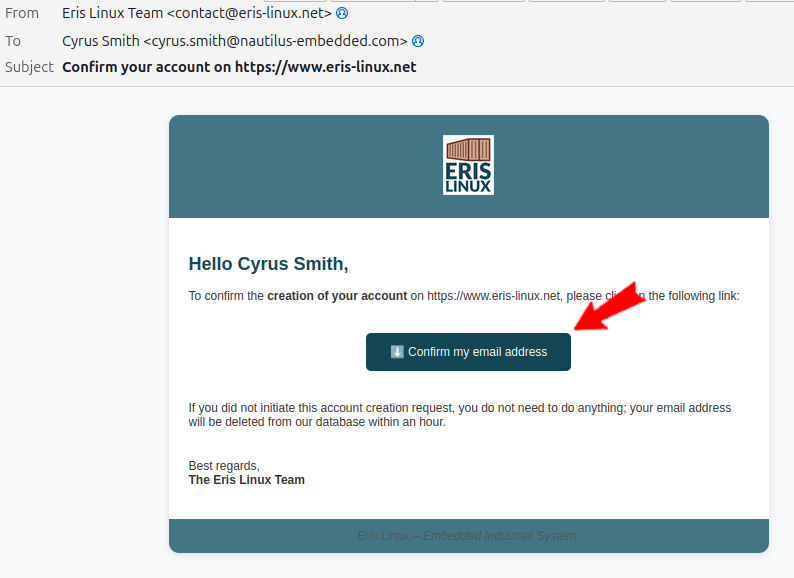
After a few seconds, you will be able to confirm your email address by clicking on a link that will be sent to your mail box:
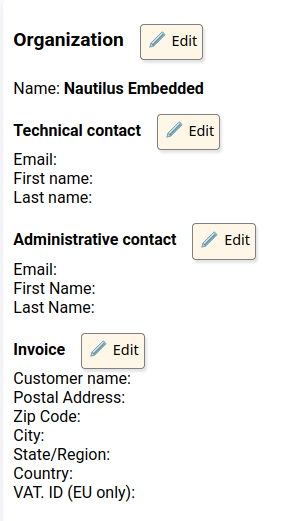
One last administrative step: link your account to the organization you belong to (company, department, association, etc.).
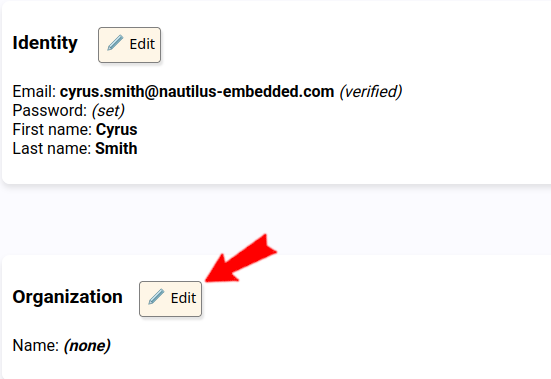
If the organization already exists, its manager will need to validate your registration. Otherwise, feel free to register your organization in the Device Manager.
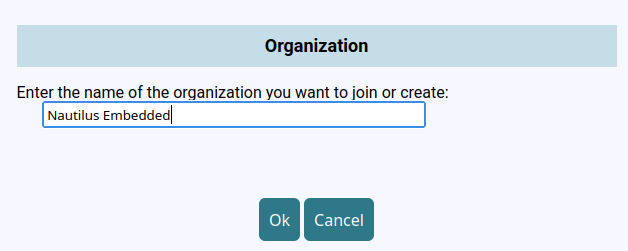
To test Eris Linux, you do not need to enter all the information about your organization. You will be asked to do so later when you decide to continue using Eris Linux.
Downloading Eris Linux Image
Once the mandatory administrative formalities have been completed, go to the “my devices” tab. At this point, the list of equipment and devices group is likely to be empty (unless you are affiliated with an organization that has already registered some devices).
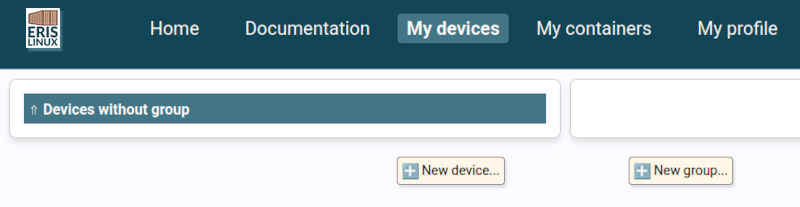
Click on the “New device” button. A window will open, allowing you to select the type of hardware card that represents your equipment.
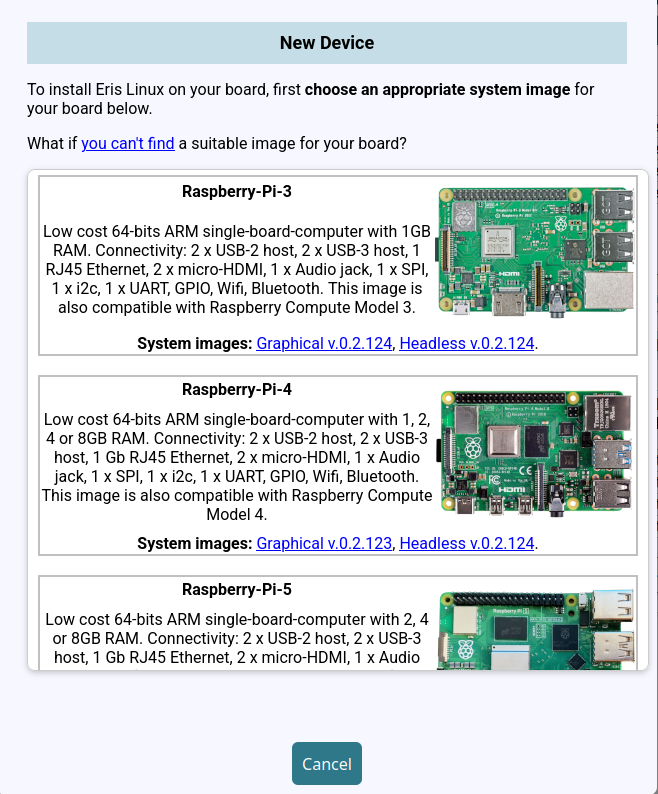
If your board is not in the list provided, please do not hesitate to contact us. If it is a board that is easily available on the market, we will likely be able to include support for it within a few days. If your card is a specific proprietary model, we will contact you to obtain the technical information necessary to make you a quotation for support by Eris Linux.
Several types of images may be available for your board. For example, we generally offer a “graphical” image including support for the Qt library, and a “headless” image without a display output.
Select the image that suits you, and you will then be asked to specify the network configuration that will allow your board to connect to the server once the image is installed.
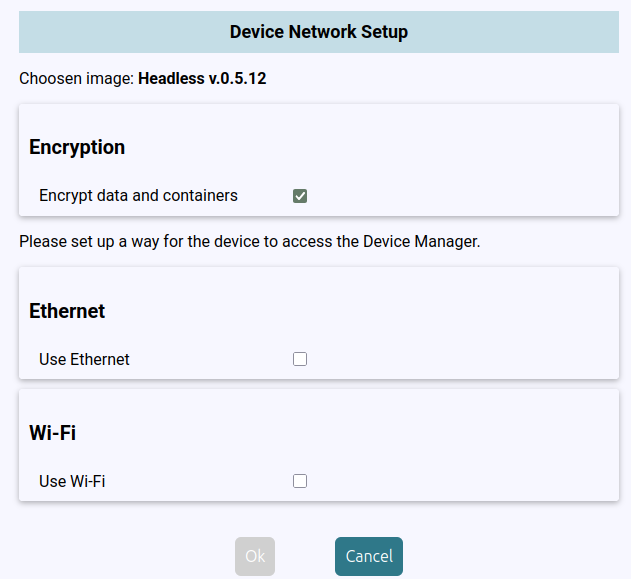
At the top of the window, you can choose whether the data and contents of the containers should be encrypted on the target device. This encryption prevents the data stored by the application from being extracted or used, even if the device is lost or stolen.
The default setting is to enable this encryption. However, this takes a little time (one or two seconds) during system startup. In some cases, you may prefer to keep the data partition unencrypted to optimize boot time.
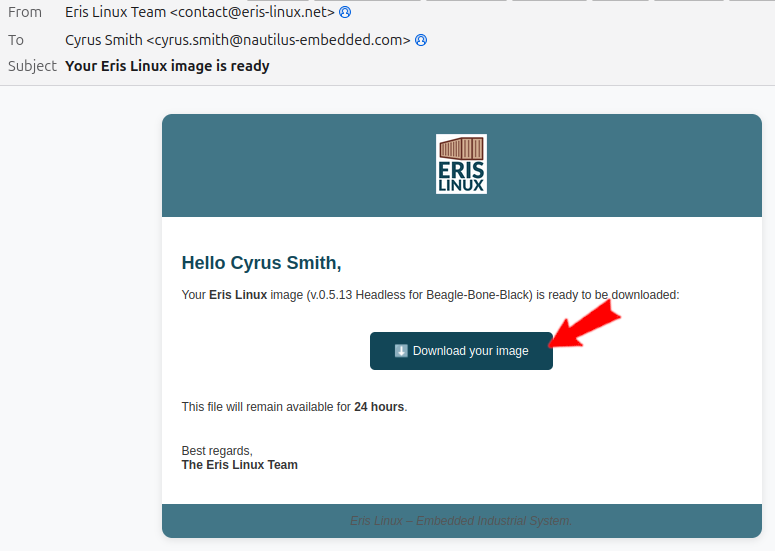
We will then prepare your image, and you will receive an email within a few minutes to download the image.
Installing Eris Linux Image on your Device
The image you download is a raw representation of your device’s flash
memory (.iso format compressed with bzip2).
Installation on your embedded system will depend on the type of device
(see detailed installation documentation in the appendix).
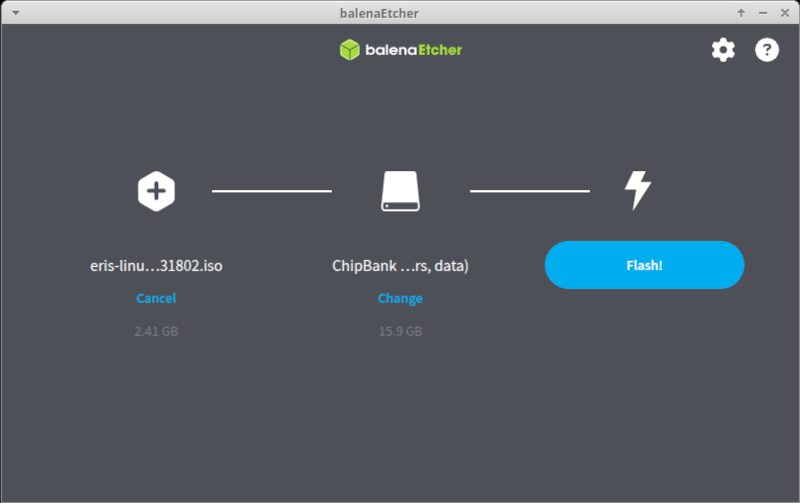
For most systems, this will involve copying it directly to a microSD card.
To do this, we recommend using the free Etcher utility from Balena (https://etcher.balena.io/), which works identically on Linux, Windows, and macOS.
The image you downloaded can be used to create as many microSD cards as you want. However, please note that once a device has booted from an SD card, this card must not be copied or used on another device (a unique ID is generated during the first boot).
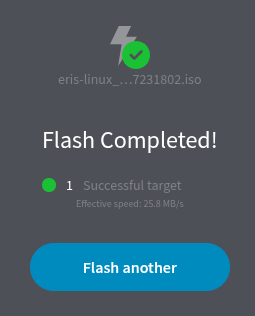
Once the microSD card is ready, insert it into your device.
If you specified during card preparation that the connection to the Eris Linux server is made using an Ethernet connection, connect your device to the network. If the connection is made via Wi-Fi, check that the network is accessible.
Then start up your device…
First boot
The first boot of the system is special and may take significantly longer than a normal startup. During this stage, some partitions will be configured and formatted, some partition will be prepared for encryption, cryptographic keys and a specific identifier for the device will be calculated.
After a few minutes, the device will contact the Eris Linux server and a new entry will appear in the left part of “My devices” tab.
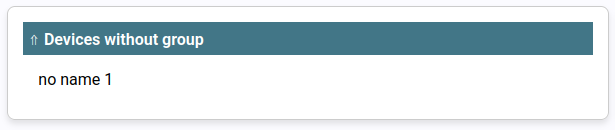
As devices are detected, they are named “no name 1”, “no name 2”, etc. You will be able to rename a device in a minute.
You can repeat these steps as many times as necessary to control all your devices. You can use the same downloaded image file for all your systems, but remember to create different microSD cards from the image file each time.
Using the Device Manager
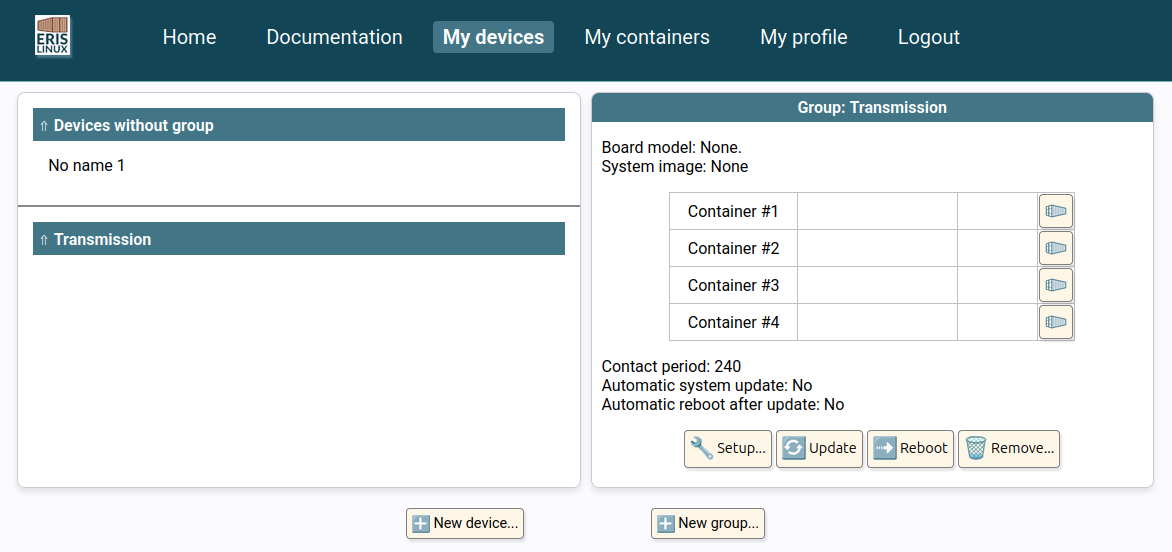
The “My devices” tab is divided into two halves: on the left is the list of devices divided into groups, and on the right is information about the selected group and device.
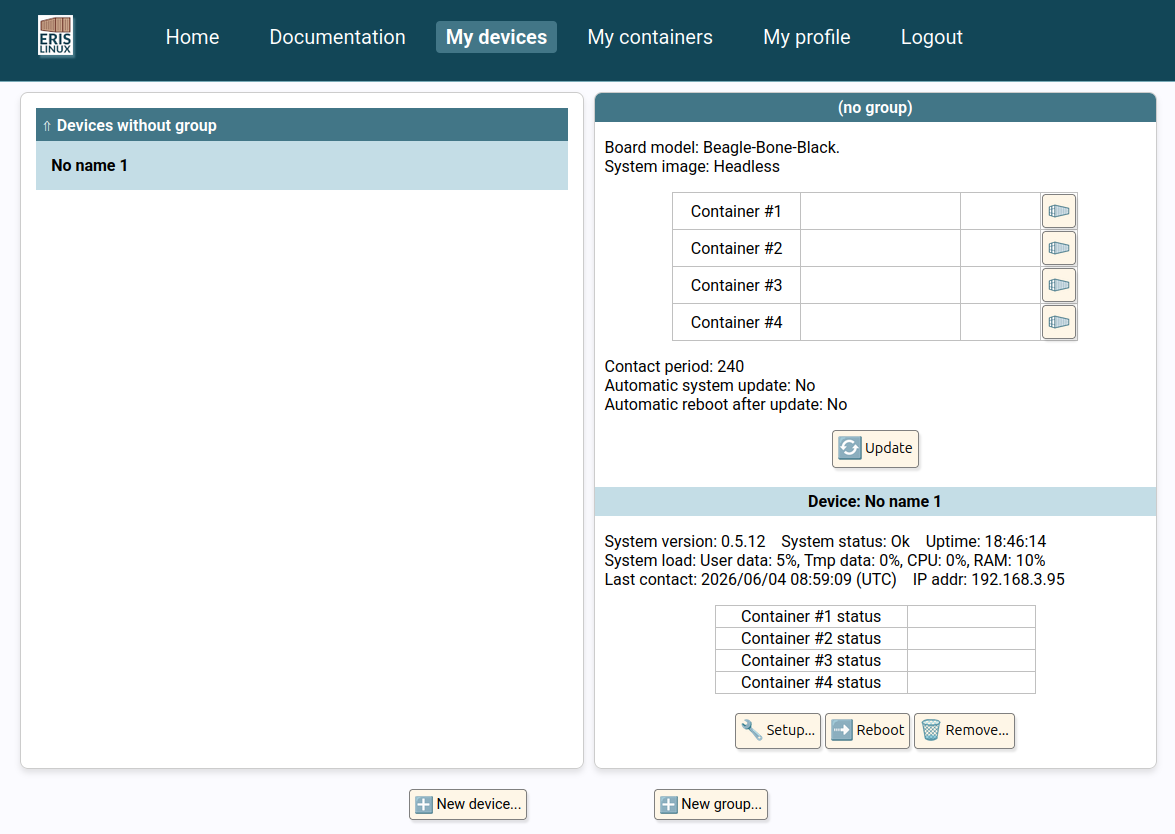
For the moment we have a single device and no group. Let’s rename our device and put it into a group we will create.
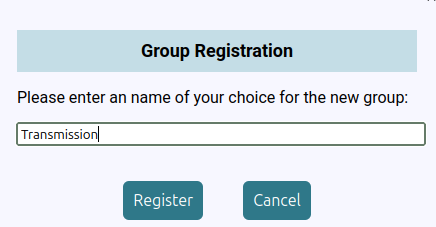
Creating a group
To create a group, you just have to click on the ”New Group…” button at the bottom of the page :
The group appear on the bottom half of the right column, but it is empty for the moment.
Add a device to a group
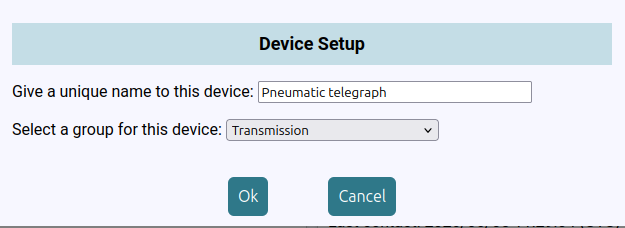
To add a device to a group, simply select it and click the “Setup…” button in the lower-right corner of the screen, within the device section.
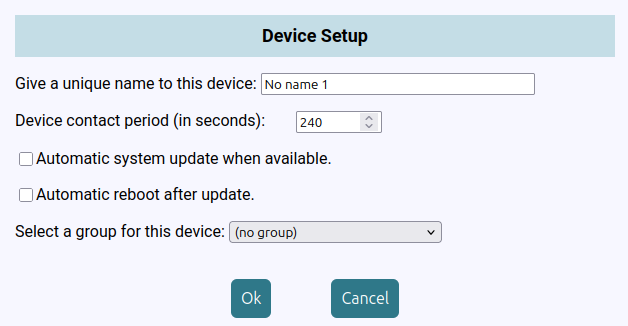
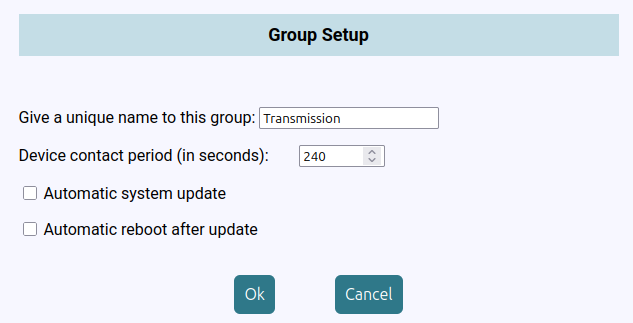
The window that opens allows you to rename the device (first field in the window) and assign it to a group (drop-down list at the bottom of the window).
The other options appear in this window only if the device does not belong to any group. Otherwise, they are located in the group configuration window, which we will cover later.
Now, the device appears in its group :

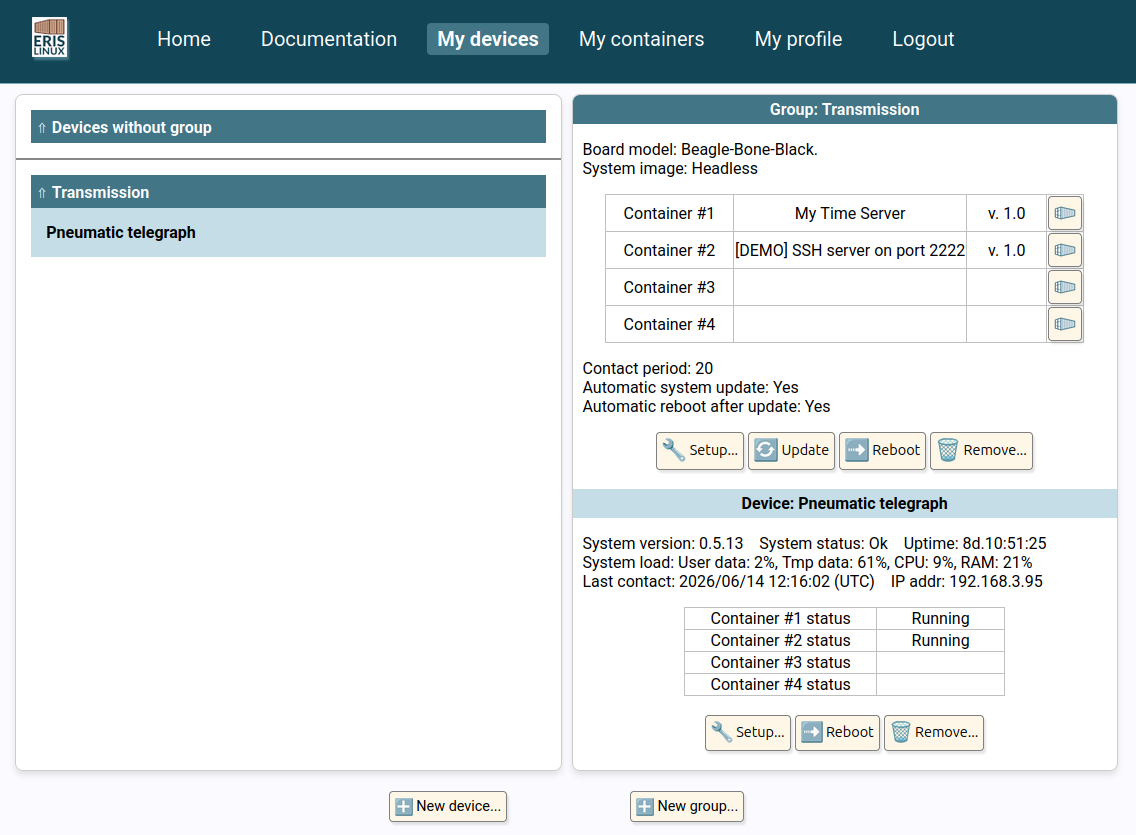
On the right side of the screen, we can see the distinction between information that applies to an entire group of devices (at the top) and information that applies only to a specific device (at the bottom).
Information about the selected group
The information that applies to the device group is as follows:
- Hardware support : type of board.
- Image type (mainly “graphical” or “headless”).
- Application containers installed in the system slots, and their version (more on this later).
- Period in seconds between device contacts to the Eris Linux server. By default, the duration is 4 minutes (240 seconds), but it can be shortened (for example, to 60 seconds during the configuration setup and testing phase) or extended (for example, to one connection per day, or 86,400 seconds, for equipment deployed with minimal interaction requirements).
- Automatic update of the system as soon as a new version is available. This option is strongly recommended for deployed devices. However, you may prefer to test new versions on a small group of devices first before rolling them out to your entire fleet.
- Automatic or on-demand restart after installing a new system image during an update. Depending on the embedded application code, it may be preferable to let the system reboot as soon as possible after installing a new update, or to reboot only on demand, once the application code’s non-interruptible tasks have been completed.
In the upper right quarter, there are also four buttons for configuring the behavior of the devices in the group. For the pseudo-group “Devices without group”, there are only one button, “Update” which in this case only affects the selected device.
The buttons are:
- “Setup” to configure the settings for the equipment in the group. The fields correspond to the settings we discussed above:
- “Update” (not currently functional) forces the update of all containers installed on devices in this group. This is useful if you prefer to test a new version on a small number of devices and then roll it out to an entire group that will wait for this command before updating.
- “Reboot” forces the restart of all devices in the group.
- “Remove” deletes the selected group provided that there are no more devices registered.
Device information and settings
At the bottom of the lower half of the screen, you’ll find information about the specific device that has been selected:
- The “version” of the Eris Linux system, which may change as the system is updated (patches, new features, etc.).
- The “status” of the system indicates the level of updates.
The possible statuses are as follows:
- The “Uptime” field indicates how long the equipment has been running. This is an indicator of system stability.
- The “System load” fields indicate the percentage of usage of several system parameters: the usage of the partition storing user data, the usage of the temporary data storage area, the processor load, and the amount of RAM used.
- The “Last contact” field is very important because it indicates the time (in UTC time zone) when the equipment last connected to the Eris Linux device manager and updated all the information in this area.
- The “IP addr” field contains the IP address of the device on its local network. This information is very useful during the initial setup or configuration phase of the system. This address can obviously only be used on the same subnet.
Finally, a table displays the “Status” of the various containers (“Running”, “Error” or an empty field for an unused container, more on this later).
The buttons available in this lower right area allow you to:
- “Setup”: configure the device (specify its name and group). If the device is not registered in a group, it is also possible in this window to configure the contact period and automatic restart after updating.
- “Reboot” the device. This reboot will occur at the next time the device contacts the server.
- “Remove” the device.
Containers handling
We’ll see a little later how to create a container to host our application code. For now, we’ll simply install the demo containers that are available directly for machines supported by Eris Linux.
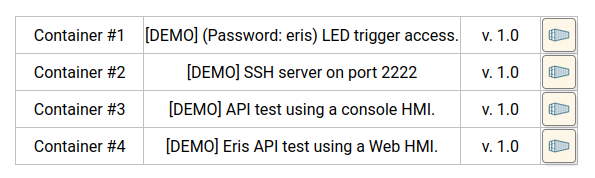
The selection of embedded containers applies to all machines in the same group. That is why the list of containers and their version numbers is displayed in a table in the upper-right corner of the “My devices” screen.
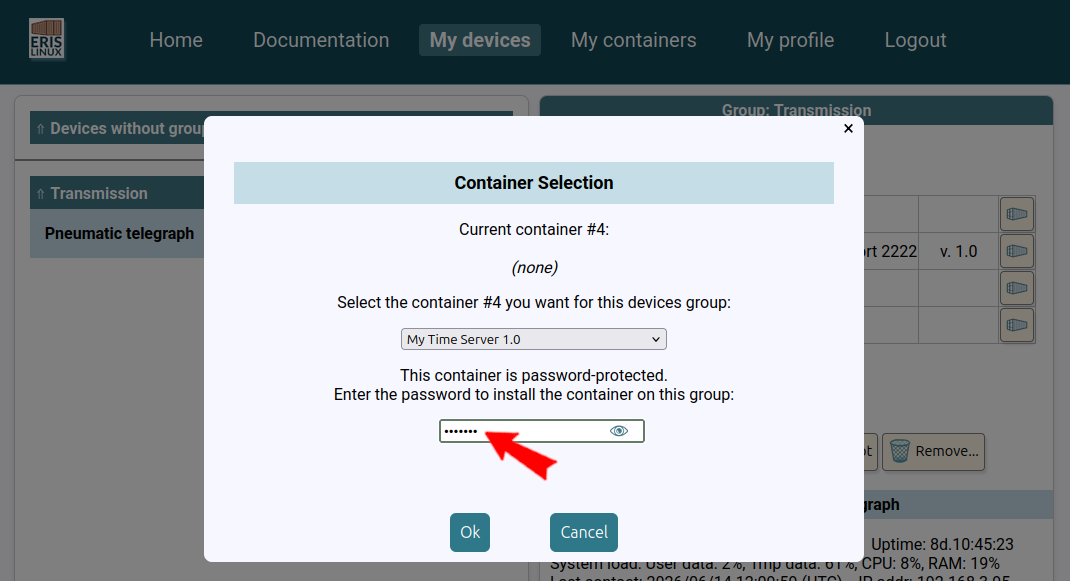
A container can be encrypted before being stored on our server. This ensures the complete confidentiality of your application code. No passwords are stored on the device manager.
In this table, you can select a container to install by clicking one of the container-shaped buttons in the right-hand column.

The number of containers that can be deployed simultaneously on the same platform is currently limited to 4. This limit may change in the future or be adjusted as needed.
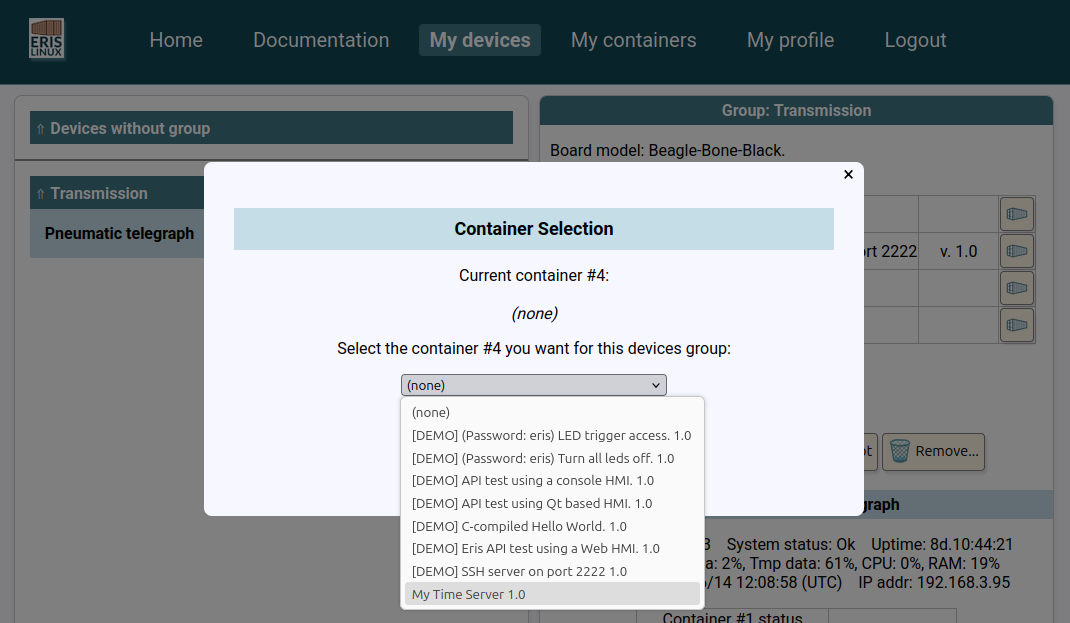
When you click one of the buttons on the right, the following configuration window appears:
This window allows you to select the content to be installed in one of the four available slots designed to hold containers. If the container has been encrypted, you will be prompted to re-enter the password. It will be transmitted using strong encryption to the relevant devices, which will use it to access the container’s contents. Again, it is never stored on the server.
Demo Containers
In the dropdown menu, you’ll find a list of the demo containers we provide. Once you’ve developed your own containers, they will also appear in this list.
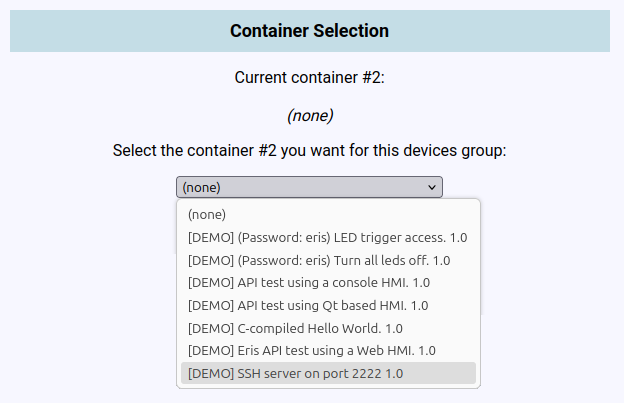
The main test containers we offer are as follows (this list will grow in the future), in order of increasing complexity:
- Demo 01: Installation of a system service. Connection via SSH to gain shell access inside the container. The TCP/IP connection port is 2222.
- Demo 02: Installation a system service with custom
setup and data. Test the Eris Linux REST API
using a web-based HMI accessible via the device’s standard TCP port 80
using a browser from a machine on the same subnet. Be sure to use the
prefix
http://and nothttps://. - Demo 03: Accessing the system’s LEDs by periodically changing their triggers (their flashing patterns). This example requires privileged access to the system. The container is password-protected. The password is “eris” (as noted in the container description, since this is a demo).
- Demo 04: Accessing the LEDs to turn them all off (useful when you remove the previous container and the LEDs keep flashing). Same password: “eris”.
- Demo 05: Example of compiling minimal C code
(
hello-world). - Demo 06: Test of the Eris Linux API using a TCP/IP
connection on port 10000 from a generic client such as
telnet,nc, orputtyrunning on a machine located on the same subnet. - Demo 07: Test of the Eris Linux API using a graphical application based on the Qt library. This container is only visible if the Eris Linux image installed on the device is of the “Graphical” type.
- Demo 08: Example of compiling minimal Rust code
(
hello-world-rust) - Demo 09: Use of a “distroless” container from Google instead of full Alpine distribution.
- Demo 10: Use of a container containing only the statically compiled executable.
- Demo 11: Example of executing a full featured Python script (that offers HTTPS connectivity).
You can place some containers in several slots if you wish:
Once you’ve confirmed your selection, you’ll need to wait for the devices in the group to contact the server (the interval between contacts was configurable in the “Group Setup” window shown above), load the container, and start executing the code.
Custom containers
If you’ve already developed application code on traditional embedded Linux systems, we have good news: developing application containers for Eris Linux is much simpler.
Let’s start with an important point: you don’t need to download or install any SDK!
Thanks to Docker’s “Buildx” mechanism, cross-compiled code for a target architecture (such as arm64) can be generated transparently from a development machine running a different architecture (typically x86).
However, this requires installing the binfmt emulators on the build machine first:
$ docker run --privileged --rm tonistiigi/binfmt --install allYou must also ensure that the following packages are installed
(AlmaLinux, CentOS, Debian, RHEL, Rocky, Ubuntu distributions, etc.)
docker-ce, docker-ce-cli, containerd.io,
docker-buildx-plugin.
To get started, I suggest you download the source code for the container demos we looked at earlier:
$ git  clone  [https://github.com/eris-linux/eris-linux-containers](https://github.com/eris-linux/eris-linux-containers)

$ cd  eris-linux-containers/

$ ls
01-ssh-server         06-api-test-tcp           11-hello-world-in-python
02-api-test-web       07-api-test-graphical     LICENSE
03-led-trigger-setup  08-hello-world-in-rust    README.md
04-turn-leds-off      09-hello-rust-distroless  create-container
05-hello-world-in-c   10-hello-rust-minimal
To compile one of these examples, simply run the
create-container script located in the root directory,
followed by three arguments:
- the architecture type, for example
arm,arm64,riscv64… - the directory containing the container’s source files, for example
05-hello-world-in-c - the intended name for the container, for example
hello-world-c
$ ./create-container  arm  05-hello-world-in-c/  hello-world-c
[...]

$ ls
01-ssh-server         06-api-test-tcp           11-hello-world-in-python
02-api-test-web       07-api-test-graphical     LICENSE
03-led-trigger-setup  08-hello-world-in-rust    README.md
04-turn-leds-off      09-hello-rust-distroless  create-container
05-hello-world-in-c   10-hello-rust-minimal     hello-world-c.tar.bz2
We suggest you choose an example written in the language of your
choice and use the Dockerfile included in its directory as
a basis for creating your own container.
Let’s write a short C program, for example. We’re going to create a mini TCP/IP server that displays the system time when someone connects to port 3700. It’s loosely based on the “Time” protocol on port 37 (see RFC 868), but its display format is easier to read.
[~]$ mkdir my-time-server

[~]$ cd my-time-server/
Create the source file, for example:
// my-time-server.c
//
// Example of Time (TCP/IP:37) like server.
//
// Demo container for Eris Linux
// See https://www.eris-linux.net for more details.
//
// 2025-2026 Christophe BLAESS
//

#include <stdio.h>
#include <stdlib.h>
#include <string.h>
#include <time.h>
#include <unistd.h>
#include <netinet/in.h>
#include <sys/socket.h>

#define PORT_NUMBER   3700

int main(void)
{
    // Open a TCP/IP socket.
    //
    int sock;
    sock = socket(AF_INET, SOCK_STREAM, IPPROTO_TCP);
    if (sock < 0) {
        perror("socket");
        exit(EXIT_FAILURE);
    }

    // Enable the "reuse address" flag.
    //
    int reuse = 1;
    if (setsockopt(sock, SOL_SOCKET, SO_REUSEADDR, &reuse, sizeof(reuse)) < 0) {
        perror("setsockopt");
        exit(EXIT_FAILURE);
    }

    // Bind the socket to its address.
    //
    struct sockaddr_in addr;
    memset(&addr, 0, sizeof(addr));
    addr.sin_family = AF_INET;
    addr.sin_port = htons(PORT_NUMBER);
    addr.sin_addr.s_addr = htonl(INADDR_ANY);
    if (bind(sock, (struct sockaddr *) &addr, sizeof(addr)) < 0) {
        perror("bind");
        exit(EXIT_FAILURE);
    }

    // Put the socket in "listen" mode.
    //
    if (listen(sock, 128) < 0) {
        perror("listen");
        exit(EXIT_FAILURE);
    }

    for (;;) {
        // Wait for a connection.
        //
        int new_sock;
        if ((new_sock = accept(sock, NULL, NULL)) < 0)
            continue;

        // Read the UTC time.
        //
        time_t now;
        time(&now);
        struct tm *tm_now = gmtime(&now);

        // Prepare the date string.
        //
        char date_string[128];
        strftime(date_string, 128, "%Y/%m/%d %H:%M:%S\n", tm_now);

        // Send it to the client. Don't handle any error.
        //
        (void) write(new_sock, date_string, strlen(date_string));

        // Close the connection.
        //
        shutdown(new_sock, 2);
        close(new_sock);
    }
}
Add a build file, such as a Makefile like this:
APP = my-time-server

OBJS = my-time-server.o

CFLAGS += -Wall -g
LDFLAGS =

all: $(APP)

$(APP): $(OBJS)
    $(CC) $(CFLAGS) $(LDFLAGS)  $^ -o $@ $(LDLIBS)

%o: %c $(INC)
    $(CC) -c $(CFLAGS) $<

clean:
    rm -rf out *.o $(APP)
You can test the native compilation of the code directly on your development machine (provided it doesn’t rely too heavily on the physical hardware).
[my-time-server]$ make clean
rm -rf out *.o my-time-server

[my-time-server]$ make
cc -Wall -g   -c -o my-time-server.o my-time-server.c
cc -Wall -g   my-time-server.o -o my-time-server

[my-time-server]$ ./my-time-server
And run on another console:
[~]$ netcat  127.0.0.1  3700
2026/06/14 09:05:44
(Enter)
[~]$
To prepare the container, we need a Dockerfile like this
one (based on the one from the hello-world-in-c demo)
#
# Dockerfile for `my-time-server` Eris Linux container
#
# Christophe BLAESS 2026
#
# License MIT
#

# This Dockerfile consists of two parts:
# - first, instructions for compiling into a dedicated container the excutable from the source code,
# - and second, instructions for creating the final container, which will contain only the executable.
#

################### Build container #########################################
#
# Use an Alpine Linux base image as build container.
#
# For reproducible builds, you may prefer a fixed version such as
# `alpine:3.22` instead of the latest one.
#
FROM  alpine:latest AS build

# Install the packages necessary to build a C program.
#
RUN apk add --no-cache build-base file

# Install the `my-time-server` source file and the `Makefile`.
#
WORKDIR /src
COPY my-time-server.c Makefile .

# Build the executable
#
RUN make

################### Final container #########################################
#
# Use an Alpine Linux base image as final container.
#
# For reproducible builds, you may prefer a fixed version such as
# `alpine:3.22` instead of the latest one.
#
FROM alpine:latest

# Install the executable and run it at container load.
#
COPY --from=build /src/my-time-server /my-time-server

CMD ["/my-time-server"]
To create the container, we use the create-container
script included with the demo containers. We described the required
arguments earlier.
[my-time-server]$ ../eris-linux-containers/create-container arm . my-time-server
#0 building with "default" instance using docker driver
#1 [internal] load build definition from Dockerfile
#1 transferring dockerfile: 1.31kB done
#1 DONE 0.0s
#2 [internal] load metadata for docker.io/library/alpine:latest
#2 DONE 0.7s
#3 [internal] load .dockerignore
#3 transferring context: 2B done
#3 DONE 0.0s
#4 [internal] load build context
#4 transferring context: 66B done
#4 DONE 0.0s
#5 [build 1/5] FROM docker.io/library/alpine:latest@sha256:a2d49ea686c2adfe3c992e47dc3b5e7fa6e6b5055609400dc2acaeb241c829f4
#5 resolve docker.io/library/alpine:latest@sha256:a2d49ea686c2adfe3c992e47dc3b5e7fa6e6b5055609400dc2acaeb241c829f4 0.0s done
#5 sha256:bce674d5697a824549061f4985dfd06a60c018b96ba50b18b7bc1f9ad6143570 3.29MB / 3.29MB 0.2s
#5 sha256:bce674d5697a824549061f4985dfd06a60c018b96ba50b18b7bc1f9ad6143570 3.29MB / 3.29MB 0.2s done
#5 extracting sha256:bce674d5697a824549061f4985dfd06a60c018b96ba50b18b7bc1f9ad6143570 0.1s done
#5 DONE 0.3s
#6 [build 2/5] RUN apk add --no-cache build-base file
#6 1.164 ( 1/22) Installing libgcc (15.2.0-r5)
#6 1.174 ( 2/22) Installing jansson (2.15.0-r0)
#6 1.183 ( 3/22) Installing libstdc++ (15.2.0-r5)
#6 1.222 ( 4/22) Installing zstd-libs (1.5.7-r2)
#6 1.239 ( 5/22) Installing binutils (2.45.1-r1)
#6 1.330 ( 6/22) Installing libmagic (5.47-r2)
#6 1.389 ( 7/22) Installing file (5.47-r2)
#6 1.395 ( 8/22) Installing libgcc-static (15.2.0-r5)
#6 1.402 ( 9/22) Installing libgomp (15.2.0-r5)
#6 1.411 (10/22) Installing libatomic (15.2.0-r5)
#6 1.418 (11/22) Installing gmp (6.3.0-r4)
#6 1.430 (12/22) Installing isl26 (0.26-r2)
#6 1.454 (13/22) Installing mpfr4 (4.2.2-r0)
#6 1.466 (14/22) Installing mpc1 (1.3.1-r1)
#6 1.473 (15/22) Installing gcc (15.2.0-r5)
#6 2.629 (16/22) Installing libstdc++-dev (15.2.0-r5)
#6 2.834 (17/22) Installing musl-dev (1.2.6-r2)
#6 2.949 (18/22) Installing g++ (15.2.0-r5)
#6 3.313 (19/22) Installing make (4.4.1-r4)
#6 3.323 (20/22) Installing fortify-headers (3.0.1-r2)
#6 3.337 (21/22) Installing patch (2.8-r0)
#6 3.346 (22/22) Installing build-base (0.5-r4)
#6 3.346 Executing busybox-1.37.0-r31.trigger
#6 3.399 OK: 161.6 MiB in 38 packages
#6 DONE 3.9s
#7 [build 3/5] WORKDIR /src
#7 DONE 0.0s
#8 [build 4/5] COPY my-time-server.c Makefile .
#8 DONE 0.0s
#9 [build 5/5] RUN make
#9 0.150 cc -Wall -g -c -o my-time-server.o my-time-server.c
#9 0.629 cc -Wall -g my-time-server.o -o my-time-server
#9 DONE 0.8s
#10 [stage-1 2/2] COPY --from=build /src/my-time-server /my-time-server
#10 DONE 0.0s
#11 exporting to client tarball
#11 sending tarball 0.0s done
#11 DONE 0.0s
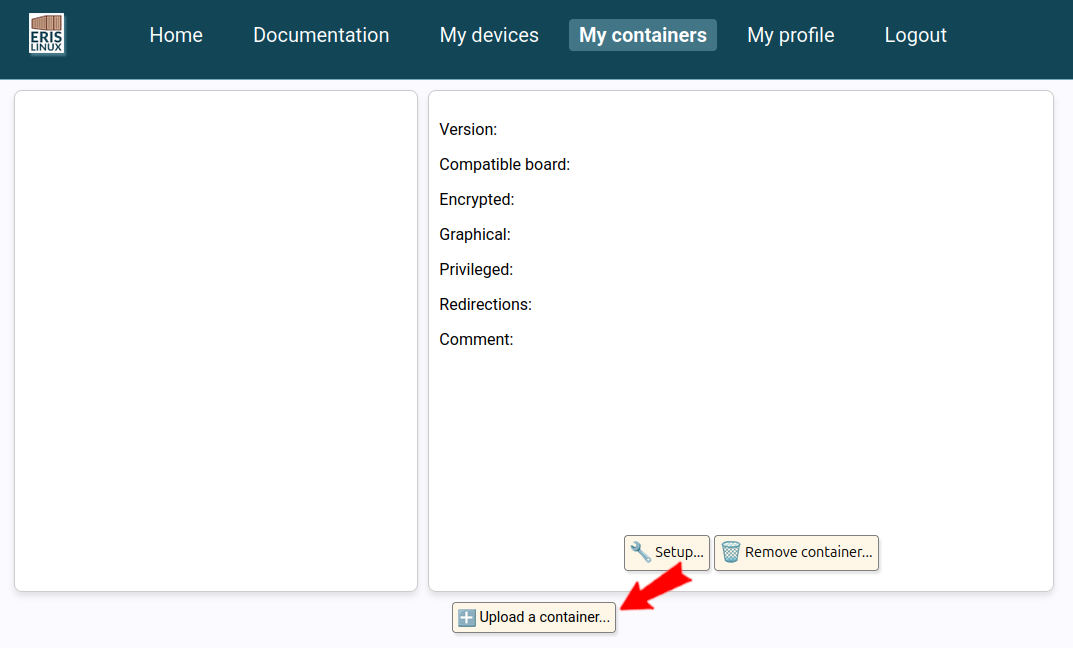
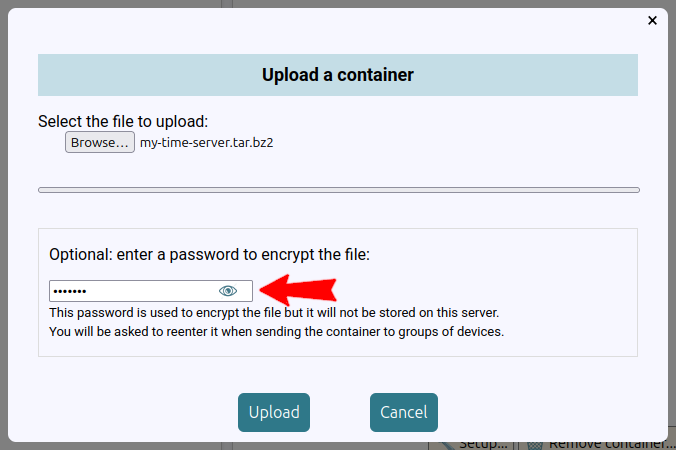
/home/build/Lab/Eris-Linux/my-time-serverYou can now upload the container to the Eris Linux server. Go to the “My containers” tab, which is currently empty, and click “Upload a container…”
Select the container file you just uploaded:
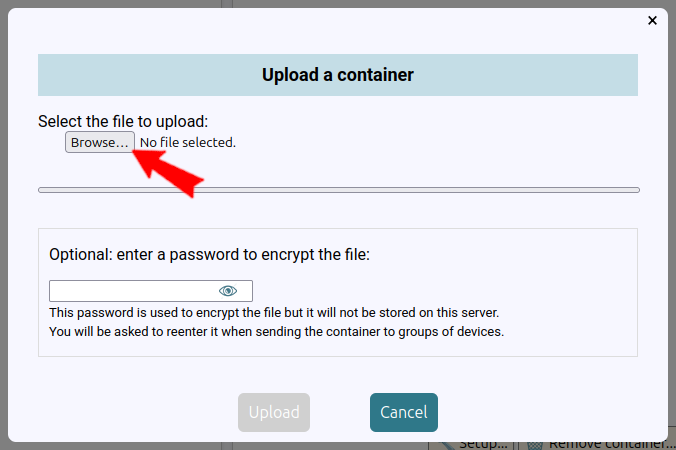
Let’s assume that this container contains highly sensitive code, and that you don’t want to leave it on our server without encryption. Fill in the password field, then click the “Upload” button.
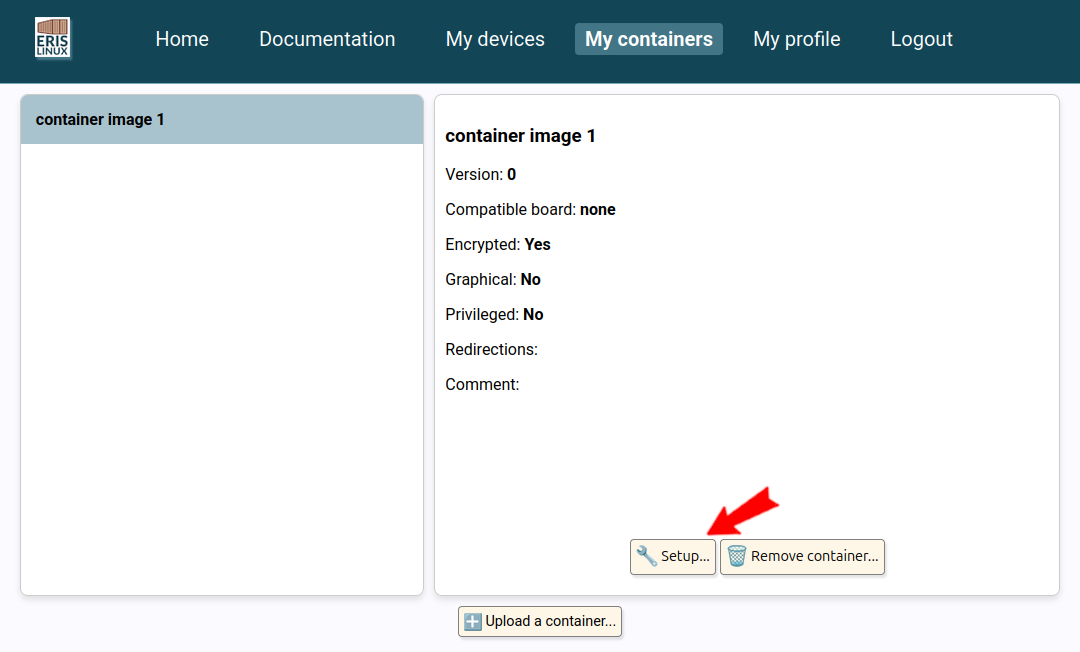
Once the container has been encrypted and uploaded to the Eris Linux server, you can configure it by selecting it and clicking the “Setup” button.
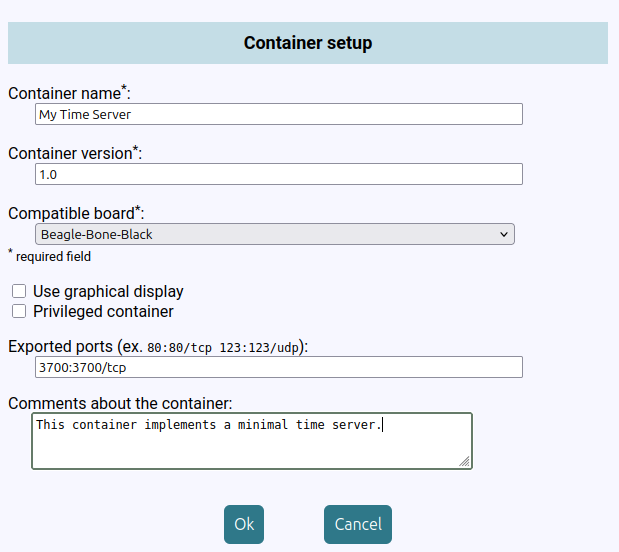
On the configuration screen, enter a name and, if desired, a version number for the container.
Also specify the type of card it is compatible with (you can upload it multiple times if it is compatible with multiple cards).
Our container does not use a graphical interface and does not require any specific privileges. We therefore leave the following two checkboxes unchecked.
Finally, we specify the TCP/IP port that the container exposes, 3700 in our case.
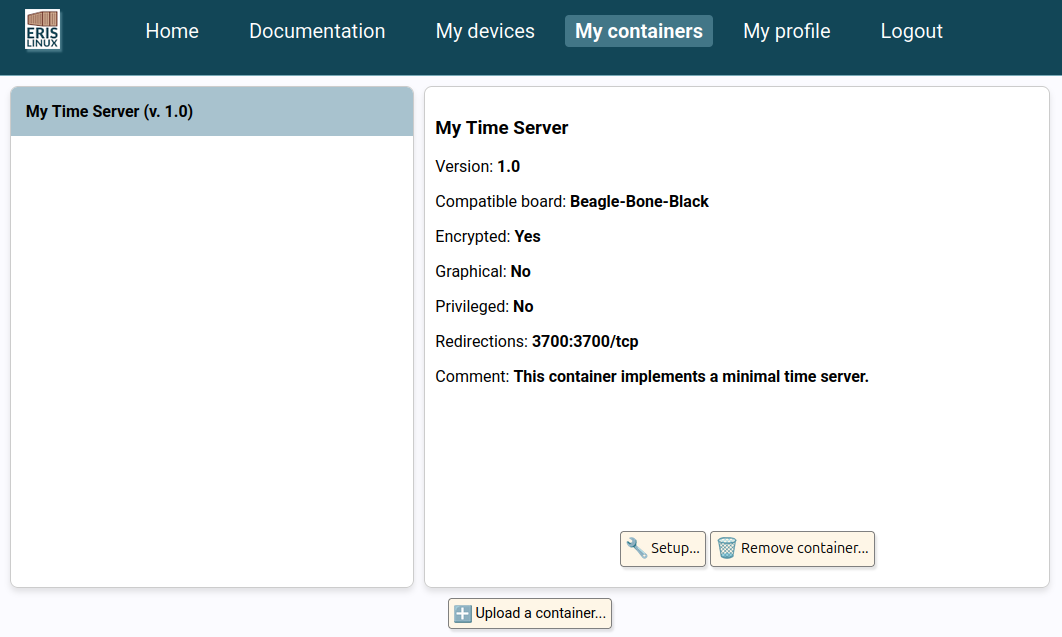
The information is displayed on the “My containers” tab, allowing you to review it before deploying the container.
On the “My devices” screen, select the relevant device group and click the container icon in the upper-right corner of the screen. Select the container you just added.
If the selected container was encrypted before being stored, a text field will prompt you to re-enter the initial password.
After a few minutes (depending on the connection time between the device and the device manager), you will see the message “Running” appear in the container status grid at the bottom right of the screen.
To test our example, simply connect using a generic TCP/IP client to the IP address listed in the device’s status area. Connect to its TCP port 3700. Of course, you must be on the same subnet as this device.
[~]$ nc  192.168.3.95  3700
2026/06/14 12:17:14

[~]$ telnet  192.168.3.95  3700
Trying 192.168.3.95...
Connected to 192.168.3.95.
Escape character is '^]'.
2026/06/14 12:17:31
Connection closed by foreign host.
You’ve just compiled your first custom container and deployed it to your embedded device. That was pretty easy, wasn’t it?
Troubleshooting
Container build error
I’m getting a docker: command not found error
when I run the create-container script.
It seems that docker is not installed on your
system.
Please install the following packages using apt,
snap, yum, dnf… depending on your
Linux distro: docker-ce, docker-ce-cli,
docker-buildx-plugin
The create-container script fails, and when I
check the error messages, I see
exec /bin/sh: exec format error or
ERROR: failed to build: failed to solve: process “/bin/sh…
The Qemu Binfmt emulators are missing on your system.
To install them, please run:
docker run --privileged --rm tonistiigi/binfmt --install allIf you later need to uninstall the emulators, you can run:
docker run --privileged --rm tonistiigi/binfmt --uninstall qemu-*Eris Linux API
The Eris Linux programming interface provides
simplified access to certain system components. You can always create a
privileged container to bypass this API and access devices directly
through the /dev and /sys directories, but
using the API ensures that you have structured and consistent
information across all your containers.